





Showing posts with label DIY. Show all posts

Sunday, July 22, 2012

DIY Indian Sack Dress Essentials


The other weekend we went to an indians and cowboys themed party. You know how we like to take these things seriously. Themed parties play the perfect excuse for us to get down and hone our DIY skills! Mischka wanted to be a cowgirl but I had something else in mind. Good thing I managed to convince her to come as an Indian girl instead. She wasn't too sold to the idea until she saw me profusely hand sewing her sack dress a few hours before the party. She jumped in and offered to help in whatever way she can. 


This is why I love doing DIY projects so much. The opportunity to get your child involved is priceless. They appreciate the effort and I can honestly see in Mischka that she's proud of what we have accomplished no matter how big or small the project is, more especially when she gets to take home a reward for being best in costume! It's almost always more economical too than having to purchase a run-of-the-mill costume from a toy store. So next time you get an invite to a themed party, try to DIY-it!


Sunday, June 17, 2012

DIY Mermaid Skirt Essentials


For a Nuffnang event, Le Misch had several themes to choose from: Underwarter; Hawaiian; Jungle; and Brittish Tea Party. It came to no surprise that she chose to be a mermaid. It was not exactly the easiest and I simply refused to buy a character themed one from the toy store. So we did a little research online and found one that was fairly easy to make using materials we already have at home. And viola, a non-restricting mermaid skirt that that cost me nothing but is definitely worth something when worn with such delight. 

She was so happy to have a hand in creating this costume and she completed her mermaid look herself with creations from her jar of beads.

Want to try it at home? Find instructions here. Enjoy!

Wednesday, January 25, 2012

DIY {Wish-You-Were-Here Postcards}

My good friend, Pen, loves receiving postcards in the mail. She's just endearingly old-fashion like that. Over the course of our friendship, it has been a tradition that I send her postcards whenever I can from whichever corner of the world I may be. I think I have sent her postcards from Paris, St. Petersburg, Athens, Istanbul, Bali, Barcelona... and the one from San Francisco is still slowly on its way. Snail mail still has got its charm on us. 

When I came across this idea from a book I picked up from SFMOMA, my heart raced a little. Why didn't I think of this before?! It would have saved me from trips to souvenir shops to pick up commercial postcards. I know this is something Pen would appreciate more.
So here's what you need:
8.5 x 11" sheets of board paper
cutter/ utility knife
ruler
cutting mat
map of your trip (I got a world map from National Bookstore)
scissors
glue stick/ double-sided tape
pens
postage

The simple steps:
1. Trim the board paper to postcard size (4.25x6")
2. Map your route. Trace your postcard boards on your chosen map sections.
3. Cut and stick your chosen map sections on your postcard boards.
4. Decorate your postcard maps according to your fancy. I drew hearts on the places that I am (supposedly) visiting.
5. Decorate the back just like how a classic postcard looks.
6. Have fun!
This idea is also great for save-the-date cards especially for destination weddings or for a fun treasure hunt. But if you have a friend like Pen, imagine the glee on her face when the postman hands her this.

**Inspired from the book Handmade Hellos 

Tuesday, November 22, 2011

DIY {Vanity Bench}


Just recently, we moved in to my in-laws and took over a room of the Mr.'s late grandpa. We did some repainting and some minor renovations. We didn't wanna spend a lot but we wanted a place that speaks well of our personal style to come home to. Some of the furniture we gave up and some we retained. One of which is this vanity bench. It was old and dusty but I saw a flicker of hope in it. It was just begging for a little DIY attention.

I had it reupholstered using a damask printed fabric and painted the legs and base in the same shade as  my birdcage. That can of paint actually went a long way.

Voila! A refurbished vanity bench in a print I adore and a color that brightens up our predominantly flat white room. 

Here's how much I spent:
Damask Fabric, Php200 (2 yards),  Cotton Club Glorietta
Dunn Edwards Lemon Punch, Php400+ (1 pint), Wilcon 
Upholstery Labor, Php300
TOTAL COST: Php900

I've shared this nook of mine a couple of times here and you're probably tired of it already. Just sharing  how one fixture ties up my little slice of peace in the bedroom.    

Tuesday, June 28, 2011

DIY Manila Manila! Birthday and Send-Off Party

Remember the DIY party for hubby's 35th featured here? Well, last Saturday, together with my accomplices Pen and Vicky, we put together another DIY small fete to celebrate a French guy's birthday and his 5 full years in Manila. And oui! Another fun and meaningful party!

Occasion: Sebastian's birthday and send-off
Theme: Manila Manila!
Location: Maje Residence
Food: Filipino by Chef Laudico
Noteworthy details: Cities and islands Seb has visited in the Philippes, his favorite Filipino food, and basically Seb's favorite all-things-Filipino

The invitation.
The buntings spelled out "Maligayang Kaarawan" and "Maligayang Paglalakbay" (Happy birthday and bon voyage!) We wanted everything to be awesomely Filipino. Most of the guests were foreigners but most of them can very well understand, some even speak the language. 
The tablescape. Elements include placemats featuring the different places Seb has visited in the Phillipines; bamboo sticks; sampaguita flowers; and Manila beer "tanzan" covers holding the place cards.
The food prepared by Chef Laudico (another one of Seb's fave) and cupcakes with jeepneys and flags of the Philippines and France.
Guests enjoyed the jeepney mural. 
The celebrant and the hostess with the mostest. 

It was a moving moment especially when Seb arrived as he had no idea what was in stored for him. Your Accomplice is once again beyond pleased with the outcome and we are all happy to be part of this special celebration. 

Cheers to Seb! You will be sorely missed. 

So there you go guys. Your Accomplice is officially open for business. We specialize in small-scale themed parties that are unique and pretty in a DIY way. Call upon your accomplices for chic and fabulous fetes sans the 'hotel-ballroom-party-planner-run-of-mill-concept' budget. We are not party planners, we are Your Accomplice in style (on-a-budget) if I may add. 

Tuesday, May 24, 2011

DIY Al Capone-meets-Hamptons Gentleman Party

The Mr. just turned 35. He's not big on parties and neither is the Mrs. I wanted to make it extra special for him, though. And since I'm BIG on DIY homegrown fetes, I called upon my 2 good friends whom I always consult with in times like these and together we envisioned and executed an intimate and meaningful celebration. 

Occasion: The Mr. turns 35.
Theme: Al Capone-meets-Hamptons Gentleman
Location: Wine Depot Reposo
Food: Asian fusion by Purple Feet
Wine: Lots of Chardonnay and some red. We were in Wine Depot, after all.
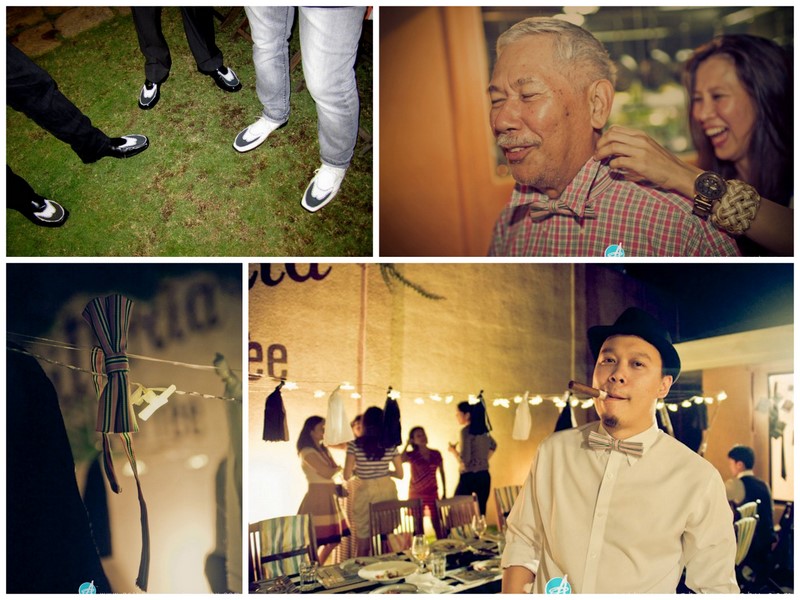
Noteworthy details: Stripes and Wingtips

The invitation and the personalized tobacco and matchbox as name cards.
The table cloth was canvas hand painted with bold black stripes. Place mats were striped gift wrappers and those colorful striped fabric I got from Fanbi.
I borrowed my mum's battery-operated christmas lights she got from Ikea and saw my vision of 'dinner under the stars' come to life.
To celebrate 35 years of his life, I put together his top 35 things from hair products to major milestones. 
35 cupcakes with stripes and wingtips.
The girls wore stripes.
While the boys wore hand made striped bow ties and wingtips stick-ons.
Pat, our yogi friend, finding time to do a pose in her fabulous striped Salsa Trends dress.
I asked 2 things of him that day: wear a dress shirt and not to work late. 
It was a happy moment with the night ending on a high note (and the Mrs. having a little too much wine).

Special thanks to my accomplices Penelope Uy and Vicky Marchadesch.  To Anthony Co for the fabulous photography. And to all our wonderful friends who were all so game, dress code, theme, and all. I wouldn't have done it without you guys.  

Cheers to the Mr. and his 35 years! 


Thursday, July 1, 2010

We Got Crafty!

It's a challenge to keep a toddler occupied the whole day especially when most of her toys have lost their novelty already. But there are so many things that we mums can do for them and with them! We just have to be really resourceful and be veeery patient.

Yesterday, my good friend Ann (an early childhood education expert) came over and all three of us got down and crafty!

The "Baaah" Project


I caught her playing with the cotton balls while we wait for Tita Ann to arrive.


Step 1: Prepare the materials. Cotton balls, Black Marker, Glue, Scissors (I know, I know my scissors are not child-friendly at all); Pink paper (I couldn't find decent art paper here! Oh National bookstore, how I miss you.) Paper plate (which I forgot to include in the picture). And of course, let us not forget the inspiration of this project, "Baah" the sheep


Step 2: Delegate the tasks. Tita Ann and Mischka will create the body of the sheep by gluing cotton balls on the paper plate. While Mum cuts out the legs, head, and tail.


Poor girl didn't like the sticky feeling of glue on her hands!


Tita Ann explained to her that it is okay to get dirty sometimes. So she got a hang of it and went back to gluing.


Baah's Body Parts


Step 3: Stick on the legs, head, and tail.


Finish! Le Misch and her Pink Baah


Now on to the next step: Destroy the artwork.


We did one more side project while the "Mr. Sun" song was playing on the background.


We had a couple more lined up but Le Misch could only take 2. Tita Ann says it's normal as activities like these are tiring for them. According to her, its like going to a board meeting. That made me laugh! But what do I know? She's the expert.

Thank you Ann! Please come again anytime you want.


Mummies, you can try this at home too! You can google more easy toddler art projects and get down and crafty yourselves with your little ones. Enjoy!